Schedule push notifications using OneSignal and custom webhook

In this post we will use OneSignal to send push notifications but you can use any provider and customize the code as required.
1. Getting started
You will be needing a Cronhooks account. You can create a free account here. You also need OneSignal account so you can access api to send notifications.
2. Implementing the webhook endpoint in your API / web application to send push notificaions
We will use aspnet core but this logic is pretty straight forward and can be implmented in any technology.
namespace Controllers
{
    public class WebhooksController : Controller
    {
        public WebhooksController()
        {

        }

        [HttpPost]
        public async Task<IActionResult> SendNotification(SendNotificationRequest request)
        {
            try
            {
                var request = WebRequest.Create("https://onesignal.com/api/v1/notifications") as HttpWebRequest;

                request.KeepAlive = true;
                request.Method = "POST";
                request.ContentType = "application/json; charset=utf-8";

                request.Headers.Add("authorization", "Basic NGEwMGZmMjItY2NkNy0xMWUzLTk5ZDUtMDAwYzI5NDBlNjJj");

                var serializer = new JavaScriptSerializer();
                var obj = new
                {
                    app_id = "5eb5a37e-b458-11e3-ac11-000c2940e62c",
                    contents = new { en = request.Message },
                    included_segments = new string[] { request.Segment }
                };
                var param = serializer.Serialize(obj);
                byte[] byteArray = Encoding.UTF8.GetBytes(param);

                string responseContent = null;

                try {
                    using (var writer = request.GetRequestStream()) {
                        writer.Write(byteArray, 0, byteArray.Length);
                    }

                    using (var response = request.GetResponse() as HttpWebResponse) {
                        using (var reader = new StreamReader(response.GetResponseStream())) {
                            responseContent = reader.ReadToEnd();
                        }
                    }
                }
                catch (WebException ex) {
                    System.Diagnostics.Debug.WriteLine(ex.Message);
                    System.Diagnostics.Debug.WriteLine(new StreamReader(ex.Response.GetResponseStream()).ReadToEnd());
                }

                return Ok();
            }
            catch(Exception ex)
            {
                return Problem();
            }
        }
    }

    public class SendNotification
    {
        public string Message { get; set;}
        public string Segment { get; set;}
    }
}
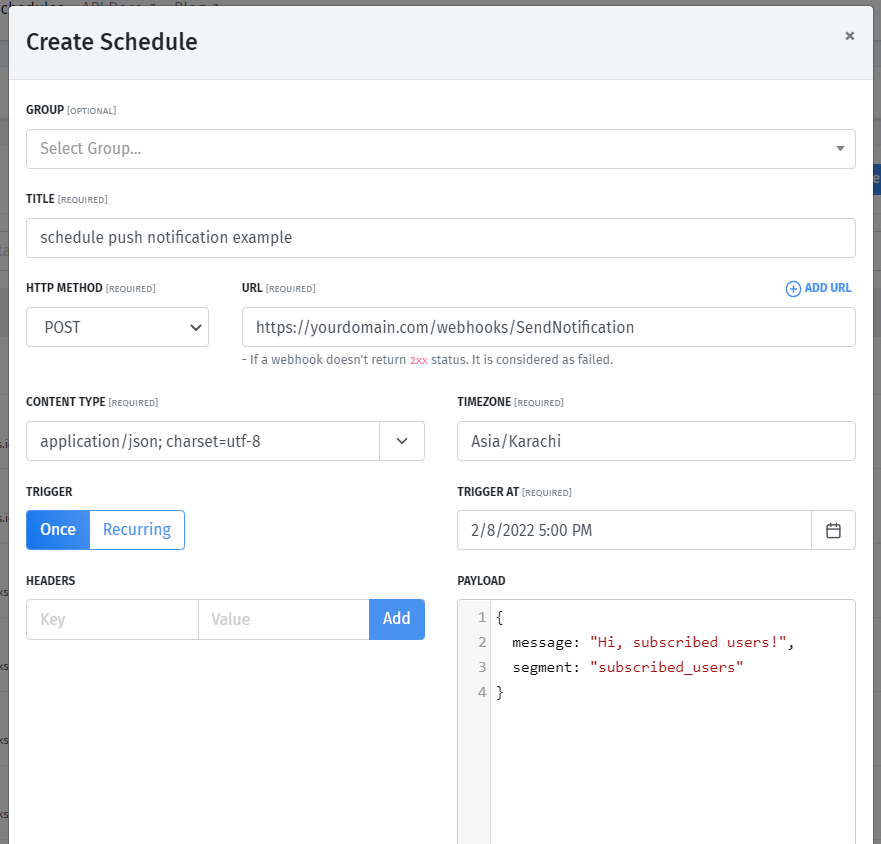
3. Create a schedule in Cronhooks
Now all setup from your side. Login into Cronhooks app and create new schedule. You can also use Cronhooks API to create schedules but we will use web app for this tutorial.
Provide a title for your understanding, URL of your webhook, timezone, time and payload. Thats all, you are all set. Now you will recieve an push notification at given time according to timezone.
Now you can schedule as much as push notifications as you want using one webhook. Thats all for now. There will be more articles for scheduling using different APIs.
Thanks